Zoho Writer - Know How
Getting started - with templates
In this section we will be making a template to get you started with zoho writer.
To first create a zoho writer document you will need to:
- Log into https://writer.zoho.eu/ using your zoho credentials.
- Once on the main page, press the plus button on the top right corner then click "Blank Document". This should take you to a new blank document
Changing the document name
After you create a document, what you will want to do first is changing the document name so you are able to easily find it in the future. To do that you will need:
- With your mouse, hover over "Untitled Document" and click on it
- Delete the "Untitled Document" text and input something to make it easier to find the document. As a standard we usually use the following naming convention: Company Name - Form Name - Template
Tools
Zoho wirter offers you lots of tools to try and mimic the customers design as closely as possible.
They can be accessed by pressing the hamburger icon in the top left corner. 
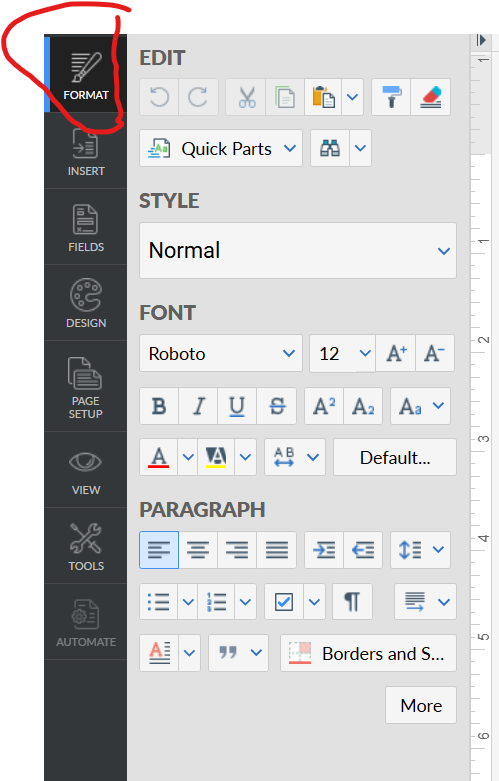 Format
The first tool you will see will be "FORMAT". This will be mainly used for text manipulation.
Going through each section inside Format:
Edit
- Undo / Redo – step backward or forward through recent actions.
- Cut / Copy / Paste (▾) – move or duplicate selection; the arrow gives paste options (match style, keep source, etc.).
- Clear formatting – strip fonts, sizes, colors, etc., back to plain text.
- Format Painter (paint roller) – copy the formatting of one bit of text and apply it to others.
- Quick Parts (menu) – insert reusable blocks (snippets like signatures, boilerplate).
- Building Blocks / Organizer (grid icon) – manage your saved Quick Parts.
Style
Style: “Normal” (dropdown) – apply a paragraph style (Normal, Headings, Title, Quote…). Styles bundle font, size, spacing, and more.
Font
- Font family (e.g., Roboto) – choose the typeface.
- Font size (e.g., 12) – set text size.
- A+ / A− – increase or decrease size in steps.
- B / I / U / S – Bold, Italic, Underline, Strikethrough.
- A² / A₂ – Superscript / Subscript.
- Aa – Change case (UPPERCASE, lowercase, Title Case, Small Caps options).
- A (underline color) – Font color.
- A with highlight – Text highlight color.
- A↔B – Character spacing/kerning options (condense, expand).
- Default… – Set the current font settings as the document’s default.
Paragraph
- Align Left / Center / Right / Justify – paragraph alignment.
- Bulleted list / Numbered list / Multilevel list (▾) – start or format lists.
- Line spacing (▾) – single, 1.15, 1.5, double, plus spacing before/after.
- Increase / Decrease Indent – shift paragraph left/right.
- Task/Checklist (☑︎ ▾) – convert to checkable list.
- (Show/Hide formatting marks) – toggle paragraph marks, tabs, spaces.
- Columns / Paragraph layout (icon with stacked lines) – set columns or layout flow (if enabled in your build).
- A (paragraph color) – paragraph text color shortcut (mirrors font color).
- “ ” (Quotes) – apply block quote/quote styling.
- Borders and Shading – paragraph borders and shading (choose borders on sides, background fill, padding).
Format - Layout
This can be accessed by pressing the "More" button at the bottom right corner inside the format window
Spacing
- Line Spacing (dropdown + “at” box) - Sets the vertical space between lines within the same paragraph. Pick a preset (Single/1.15/1.5/Double/Exactly/Multiple).
- If you choose Exactly, the at box is the exact point size of each line (e.g., 14 pt).
- If you choose Multiple, the at box is a multiplier (e.g., 1.2 = 120% of single spacing).
- Char Spacing (dropdown) - Adjusts spacing between characters (tracking). Options typically include Normal, Expanded, Condensed with amounts.
Indent
- Paragraph Spacing ( Before / After ) - Adds extra space above (Before) or below (After) the paragraph, measured in points. Use this instead of extra blank lines to control paragraph separation.
- Left / Right - Indents the entire paragraph inward from the left or right margin by the specified amount (inches/cm depending on your settings).
- First Line vs Hanging (radio + amount)
- First Line - Indents only the first line by the amount, leaving the rest flush with the margin (common for manuscript paragraphs).
- Hanging - The first line stays at the margin and all subsequent lines are indented by the amount (common for bibliographies, lists).
Line & Page Break
- Enable Widow/Orphan Control - Prevents a single line of a paragraph from being stranded at the top (widow) or bottom (orphan) of a page by pushing/pulling lines to keep at least two together.
- Keep Lines Together - Forces all lines of the paragraph to stay on the same page—no splitting across a page break.
- Page Break Before - Always starts this paragraph at the top of a new page.
- Keep With Next - Keeps this paragraph on the same page as the following paragraph—useful for headings so they don’t separate from the first body paragraph or list that follows.
Format - Design
Style
- Style (e.g., “Normal”) - Apply a paragraph style (Normal, Heading levels, Quote, etc.). Styles bundle font, spacing, and layout.
- Align Left / Center / Right – where the paragraph sits between the margins.
- Justify – straight edges on both left and right by spacing words.
- Distribute (if shown) – distributes characters evenly (useful for some languages).
- Show/Hide marks – toggles visibility of paragraph marks, tabs, spaces to help with layout.
- List row (bullets / numbers / multilevel / checklist)
- Bulleted List – apply or change bullet style.
- Numbered List – 1., a., i., etc.
- Multilevel – hierarchies (1 → 1.1 → 1.1.1…).
- Checklist – turns the paragraph into a checkbox item.
Borders
Controls a frame around the paragraph (not the whole page).
- Border presets (small square icons) - Choose the side of the border you want to apply the (If you click it it shows which sides each icon affects)
- Border colour (black square) - Choose the colour of the specific side of the border you have selected in the border presets
- Border width (the hamburger) - Choose the width of the specific side of the border you have selected in the border presets
- Border style (hamburger with multiple doted lines) - Choose the style of the border (dotted, dash, etc)
- Border none - Remove the of the specific side of the border you have selected in the border presets
- Reset - Clears all current border settings for the paragraph.
- Border radius (enabled after adding a border) - Rounds the corners of the paragraph border by the amount you set (in px).
- Distance from text (enabled after adding a border) - The space between the border line and the paragraph text (top/left/bottom/right presets or a single value depending on the option chosen).
Paragraph Background
- Fill (color swatch icon) - Adds a background color behind the paragraph (spans the paragraph width).
- No Fill (icon with red slash) - Removes any background color.
- Reset (button) - Clears the paragraph’s background settings back to default.
Insert
- Image – place an image from your computer, cloud drive, or URL; you can size, crop, wrap text, and add alt text.
- Table – insert a table; set rows/columns, header row, styles, and later merge cells or add formulas.
- Drawings – open a canvas to create shapes, arrows, flowcharts, and diagrams that drop into the doc as a single object.
- Text Box – a movable text container with its own border/background, useful for callouts.
- Symbol – insert special characters (©, ±, arrows, math, currency, etc.).
- Equation – add mathematical notation via an editor (fractions, integrals, matrices).
- Chart – insert a bar/line/pie/etc.; you can type data in a mini-sheet or link to a sheet.
- Videos – embed a video (e.g., from a URL or service) so it plays in the doc/web view.
- Barcode – generate and insert a Code-128/UPC etc. from text you supply.
- QR Code – generate a scannable code (often for URLs or IDs).
- Horizontal Line – insert a divider rule across the page.
Signature
- Signature – place an e-signature field or your saved signature for approval workflows.
- Initial – insert an initials block/field similar to signature, typically for page-by-page initials.
References & Comments
- Comments – add a margin comment tied to selected text; supports replies/resolve.
- Link – create a hyperlink to a web address, email, or internal target (heading/bookmark).
- Bookmark – mark a location so you can link to it from elsewhere in the doc.
- Table of Contents – insert a TOC generated from heading styles; updates as you edit.
- Endnote – add a numbered note collected at the end of the document.
- Footnote – add a numbered note at the bottom of the current page.
- Embed – embed external content (maps, forms, snippets) via URL or code.
- Code – insert inline code or a formatted code block with monospaced styling.
- Captions – add figure/table/equation captions; can auto-number and build lists of figures/tables.
- Citations & Bibliography – insert citations from a library and generate a reference list in styles like APA/MLA/Chicago.
- Cross Reference – insert a live reference to another element (e.g., “see Figure 3”); updates numbering automatically.
Sections & Pages
- Header – insert or edit the header area; supports different first page/odd–even headers. This can also be done by double clicking the top part of the page
- Footer – insert or edit the footer; common for page numbers, dates, confidentiality. This can also be done by double clicking the bottom part of the page
- Blank Page – insert a new page at the cursor.
- Break – insert a Page Break, Section Break (Next/Continuous), or Column Break to control layout.
- Cover page – add a pre-designed title page template at the start.
- Append Documents – insert another document’s contents after the cursor (good for combining files).
Page Setup
Settings
- Page Size (Letter 8.5"×11" dropdown) - Chooses the paper size for the whole document (Letter, A4, Legal, etc.). Affects print/export layout. We usually set this to A4
- Orientation (Portrait / Landscape buttons) - Rotates the page layout vertically (Portrait) or horizontally (Landscape).
- Columns
- Column presets (icons: 1, 2, 3, 2-with-narrow-left/right, etc.) - Splits body text into newspaper-style columns for the current section.
- More opens detailed options (number, spacing, line between, apply to whole doc/this section).
Margins
- Margins (dropdown) - Applies margin presets (e.g., Normal, Narrow, Wide, Mirror, None). Sets the white space between page edge and text area. This sets the distance from edge
Distance from edge
- Header / Footer (numeric steppers) - Sets how far the header or footer sits from the page edge (top/bottom). Larger values push them closer to the text area.
- Set as Default - Saves the current size, orientation, margins, header/footer distances as your default for new documents.
- Advanced page setup - Expands additional options , typically including: different first page/odd–even headers & footers, line between columns, section/page numbering, background/page color, and applying settings to This section vs Whole document.
Page Setup - Design
Page Borders
- None / Preset thumbnails - Apply a decorative or plain border around the entire page (not just a paragraph). Click a thumbnail to apply that style to the current scope (document or section—see Advanced setup below).
- Border Properties - Opens detailed settings: line style/weight/color, which sides (top/bottom/left/right), shadow/box options, and distance from page edge (padding).
Page Background
- Fill (color swatch) - Sets a background color for the page. Affects on-screen view and PDF exports; some printers may ignore page backgrounds unless enabled.
- No Fill (slashed icon) - Removes the page background color.
- Reset - Clears background to the default (no fill).
Watermark
- Watermark - Insert text or image watermarks (e.g., “DRAFT”, logo). Controls typically include: text content, font, size, color, transparency, diagonal/horizontal layout, or an image with scale and opacity.
Advanced page setup
- Advanced page setup - Lets you choose where your settings apply:
- Document level setup - Borders, background, and watermark apply to the whole document (all sections), unless sections override them.
- Section level setup - Apply settings only to the current section—useful when different chapters need different borders/backgrounds/watermarks. (Insert a Section Break first if needed.)